API Management serves as a middleware/proxy between your infrastructure, Logic Apps and Assemble, which can be used to (e.g.) restrict API requests to authenticated IP addresses within the organisation, internal applications, etc.
Logic Apps provides a visual way of interacting with Assemble’s API without much configuration or coding required.
A Logic Apps Custom Connector (LACC) provides a template of where the Assemble API endpoints can be reached, what triggers Assemble will run and what to expect from endpoints them after submitting data
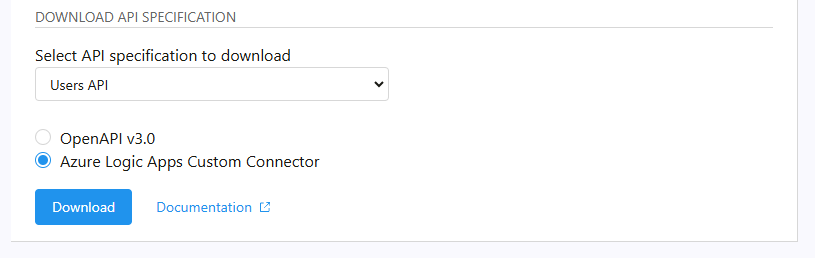
As an Admin, visit Assemble admin settings, choose OpenAPI, select "Users API" in the dropdown, choose "Azure Logic Apps Custom Connector" and click download. This will download an OpenAPI v2 specification file that is customised to your organisation and environment which can then be imported directly into Azure Logic Apps Custom Connectors.
Within the Azure portal, click on 'Logic Apps Custom Connector'. Click 'Create' and give the LACC a name, for example "Users Endpoint". Assign the resource to the appropriate resource group, then click "Create".

Once the resource is created, click "Go to Resource", then click "Edit" at the top of the page. You will then be able to add the file contents to the LACC. This can be done by clicking the ‘editor’ tab at the top right of the page and pasting the file contents, or by importing the downloaded LACC file by uploading it.
Important: If the Logic Apps Custom Connector will be connecting via API management, the host will need to be updated before connecting to Assemble.
Search for "API management services" in the Azure portal, create a new API management instance.
Once the resource is created, click "Define a new OpenAPI", give it the name "Users" with the API suffix of "users". Import the OpenAPI 3.0 spec file downloaded from the Assemble OpenAPI page, then save changes.
Under inbound processing, click Base, and add the following policy outline
<!-- Send request to Assemble to obtain a bearer token -->

<!-- The following parameters need to be set up as "Named values" within API Management Service -->
<!-- Parameters: authorizationServer - format https://{slug}.goassemble.com/oauth/token -->
<!-- Parameters: scope – Space separated string of Assemble API scopes -->
<!-- Parameters: clientId - OAuth 2.0 Client ID obtained from Assemble settings -->
<!-- Parameters: clientSecret - OAuth 2.0 Client secret obtained from Assemble settings -->
<policies>
    <inbound>
        <base />
        <cache-lookup-value key="@("bearerToken")" variable-name="bearerToken" />
        <choose>
            <when condi-tion="@(!context.Variables.ContainsKey("bearerToken"))">
                <send-request ignore-error="true" timeout="20" response-variable-name="requestResponse" mode="new">
                    <set-url></set-url>
                    <set-method>POST</set-method>
                    <set-header name="Content-Type" exists-action="override">
                        <value>application/x-www-form-urlencoded</value>
                    </set-header>
                      <set-body>@{
                        return "cli-ent_id=&scope=&client_secret=&grant_type=client_credentials";
                    }</set-body>
                </send-request>
                <set-variable name="jsonResponse" val-ue="@(((IResponse)context.Variables["requestResponse"]).Body.As<JObject>())" />
                <set-variable name="bearerToken" val-ue="@((string)((JObject)context.Variables["jsonResponse"])["access_token"])" />
                <set-variable name="tokenDurationSeconds" val-ue="@((int)((JObject)context.Variables["jsonResponse"])["expires_in"])" />
                <cache-store-value key="bearerToken" val-ue="@((string)context.Variables["bearerToken"])" dura-tion="@((int)context.Variables["tokenDurationSeconds"])" />
            </when>
        </choose>
        <set-header name="Authorization" exists-action="override">
            <value>@("Bearer " + (string)context.Variables["bearerToken"])</value>
        </set-header>
        <!--  Don't expose APIM subscription key to the backend. -->
        <set-header name="Ocp-Apim-Subscription-Key" exists-action="delete" />
    </inbound>
    <backend>
        <base />
    </backend>
    <outbound>
        <choose>
            <when condition="@(context.Response.StatusCode == 401 || con-text.Response.StatusCode == 403)">
                <cache-remove-value key="bearerToken" />
            </when>
        </choose>
        <base />
    </outbound>
    <on-error>
        <base />
    </on-error>
</policies>
Important: Under the settings tab, uncheck require OCIM subscription key if you intend to use this APIM with LACC.
Important: When operating in the staging/training environment of Assemble, resources will need to be created in at least the "Basic" tier as this is the only way to get a fixed IP address for Azure services. You should also create all resources in the "UK South" region as we have pre-seeded the IPs from this region to allow access to staging. You may still need to extract specific IPs from Azure depending on the services you are connecting to an Assemble staging instance. Please contact support for assistance around IP access to your environment.
Save changes
Go back to the created Logic Apps Custom Connector, edit it, and update the host to the API management instance.
Create a new logic app in Azure by adding a new "Logic Apps" resource if you have not done so already. Click "Edit" at the top of the screen.
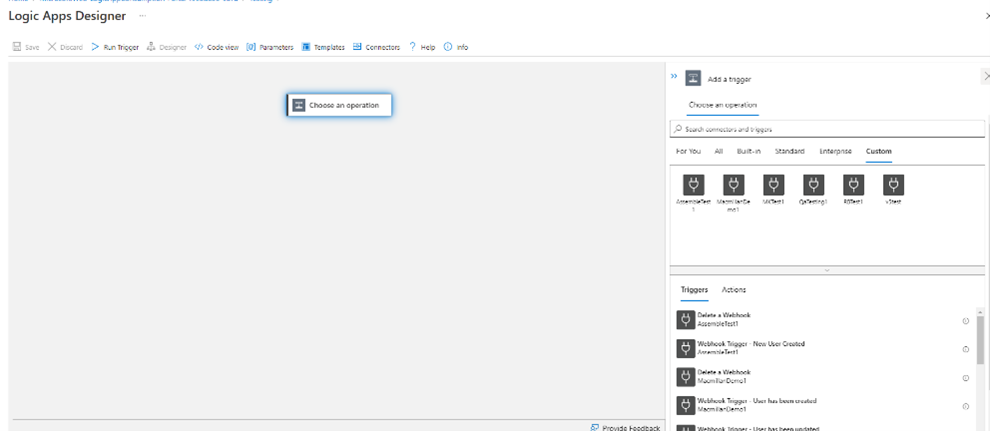
Add a new Trigger, select ‘custom’, and then select the name of the logic apps custom connector.
You should then select the User Webhook event to trigger the logic apps flow.
You will be asked to enter a User ID. Enter the Assemble User ID of the Administrative User the webhook will be created as.
Saving the trigger and clicking "Run Trigger" at the top of the page should run the webhook and register the webhook in Assemble, provided the authentication credentials were correctly configured. This can be verified by logging into Assemble as an Administrator, clicking on the "Webhooks" setting page, and seeing if a new webhook has been registered.
After the webhook trigger has been saved, add subsequent actions underneath the flow. Selecting "dynamic content" and typing in "id" should provide an option to select the unique ID number associated with the user.
Important: Actions which update or create new records may require corresponding input data that may not be readily obvious, such as "Leaving Reason ID" when ending a role profile. Please refer to the developer documentation and Assemble API for more details.
If carrying out tests on Assemble’s Dev or Staging environments, Logic Apps will be unable to communicate with Assemble directly; All requests should be proxied through an API management instance with the basic service level, and the virtual IP address (external public address) should be added to Assemble’s Access IP list.
In logic apps, when inside a foreach ‘control’ action (to iterate over arrayable responses), fields should be extracted for subsequent actions by using the item() azure function expression to select data from the current iterated item, for example:
item()['id']
item()['phone_number']
If prompted to input Refresh URL when setting up the Logic Apps Custom Connector, you can re-use the Token URL.
